前言
互联网的世界真的无比美妙,自从翻越了万里长城,我学到了太多的东西,没见到新的知识都觉得相见恨晚。搭建自己的博客的想法由来已久,现在终于搭建成功了,在此记录一下。
前段时间在网上看到如何在github上搭建自己的博客,折腾了一番用Hexo搭建成功,但是总觉得xxx.github.io的名字很奇葩,所以想在自己的VPS上搭建,在搬瓦工上搭建LNMP后SS就不能用了,不知道是不是有冲突,也没查出原因,就凑合着用github.io吧。
机缘巧合,发现了Github Student Developer Pack这个好东西,申请过程也比较繁琐,原来的教程很多都不适用,在上传了学生证之后,终于申请下来,申请说明也写了很长(用Google Translate的)。提供的资源很多,其中的DigitalOcean优惠券($50)正是我需要的,还有NameCheap的一年.me免费域名。于是,进化旅程开始了。
准备工作
在Github搭建Hexo博客,网上的教程有很多,我参考了–使用GitHub和Hexo搭建免费静态Blog,这个教程很详细,还有怎么选择喜欢的主题–Jacman基于Pacman修改的Hexo主题。
注册DigitalOcean,新建VPS服务器,我选了每月5刀的Ubuntu_14.04,一直很喜欢Ubuntu。配置如下:512 MB Memory / 20 GB Disk / NYC3,每月1T流量。
3. NameCheap免费一年的.me域名。
Windows本地操作
安装Node.js
在Node.js官网下载最新版,一路默认安装。
安装Github
下载Github Desktop并安装,然后登录自己的Github账户。
然后我们需要生成SSH密钥,按下面的步骤进行。
打开
C:\Users\<用户名>\.ssh文件夹,如果没有就新建生成ssh密钥,打开Git Shell,输入以下命令:
ssh-keygen -t rsa -C "email@example.com"#一路回车生成公钥和密钥,一会要用到公钥id_rsa.pub
安装Hexo
新建网站目录:
在你电脑的任意位置创建一个文件夹(例如E:\hexo,下文以此代替),作为网站目录。
安装Hexo:
在Git Shell,输入以下命令:
cd E:\hexo
npm install -g hexo-cli
npm install hexo --save
hexo init
npm install
hexo d -fg
hexo server
打开http://localhost:4000 即可看到你的站点(当然还没有发布到网络)。
你可以看见hexo文件夹下有一个themes文件夹,这是可以自定义的,从而改变网站的呈现形式,官网也提供了一些可供选择的主题。我选择喜欢的主题–Jacman基于Pacman修改的Hexo主题。
(可选)升级Hexo到最新版本
参考:https://novnan.github.io/Hexo/update_hexo/
hexo version
npm i hexo-cli -g
hexo version
npm install -g npm-check
npm-check
npm install -g npm-upgrade
npm-upgrade
npm update -g
npm update --save
hexo version
(可选)升级Hexo到制定版本
hexo version
npm install --save hexo@5.2.0
hexo version
VPS 的操作
安装 Git
apt-get update && apt-get upgrade -y #更新内核
sudo apt-get install git-core
新建xiaobailong24用户添加sudo权限
sudo adduser xiaobailong24
sudo chmod 740 /etc/sudoers
sudo vim /etc/sudoers
在vi编辑中找到如下内容:
## Allow root to run any commands anywhere
root    ALL=(ALL)     ALL
在下面添加一行
xiaobailong24 ALL=(ALL) ALL
保存并退出后执行
sudo chmod 440 /etc/sudoers
安装 lnmp
根据lnmp、lamp、lnmpa一键安装包,然后新建虚拟主机:xiaobailong24.com
执行以下命令:
sudo vim /usr/local/nginx/conf/nginx.conf
修改 Nginx 默认 server root: root /data/wwwroot/xiaobailong24.com;
######################## default ############################
  server {
    listen 80;
    server_name _;
    access_log /data/wwwlogs/access_nginx.log combined;
    root /data/wwwroot/xiaobailong24.com;
    index index.html index.htm index.php;
    #error_page 404 /404.html;
    #error_page 502 /502.html;
    location /nginx_status {
      stub_status on;
      access_log off;
      allow 127.0.0.1;
      deny all;
    }
    location ~ [^/]\.php(/|$) {
      #fastcgi_pass remote_php_ip:9000;
      fastcgi_pass unix:/dev/shm/php-cgi.sock;
      fastcgi_index index.php;
      include fastcgi.conf;
    }
    location ~ .*\.(gif|jpg|jpeg|png|bmp|swf|flv|mp4|ico)$ {
      expires 30d;
      access_log off;
    }
    location ~ .*\.(js|css)?$ {
      expires 7d;
      access_log off;
    }
    location ~ ^/(\.user.ini|\.ht|\.git|\.svn|\.project|LICENSE|README.md) {
      deny all;
    }
  }
然后重启 Nginx:
sudo service nginx restart
创建git仓库,并配置ssh登录
进入到刚刚新建好的虚拟主机根目录,然后创建 Git 仓库
cd /data/wwwroot/xiaobailong24.com
sudo chown xiaobailong24:xiaobailong24 -R /data/wwwroot/xiaobailong24.com
mkdir .git && cd .git
git init --bare
配置git hooks
cd /data/wwwroot/xiaobailong24.com/.git/hooks
vim post-receive
输入如下内容后保存退出,
#!/bin/bash
GIT_REPO=/data/wwwroot/xiaobailong24.com
TMP_GIT_CLONE=/tmp/hexo
PUBLIC_WWW=/data/wwwroot/xiaobailong24.com
rm -rf ${TMP_GIT_CLONE}
git clone $GIT_REPO $TMP_GIT_CLONE
rm -rf ${PUBLIC_WWW}/*
cp -rf ${TMP_GIT_CLONE}/* ${PUBLIC_WWW}
然后赋予脚本的执行权限
chmod +x post-receive
本机的最后配置
配置hexo配置文件
位于hexo文件夹下,_config.yml,修改deploy选项,注意替换IP和Github地址
deploy:
- type: git
  message: update
  branch: master
  repo: ssh://xiaobailong24@**<YOUR VPS IP>**:**<PORT>**/data/wwwroot/xiaobailong24.com
- type: git
  message: update
  branch: master
  repo: ssh://git@github.com:xiaobailong24/xiaobailong24.github.io.git
接着在Git Shell输入以下命令就可以发布自己的博客到网站上。
npm install hexo-delopyer-git --save
hexo clean && hexo g && hexo d
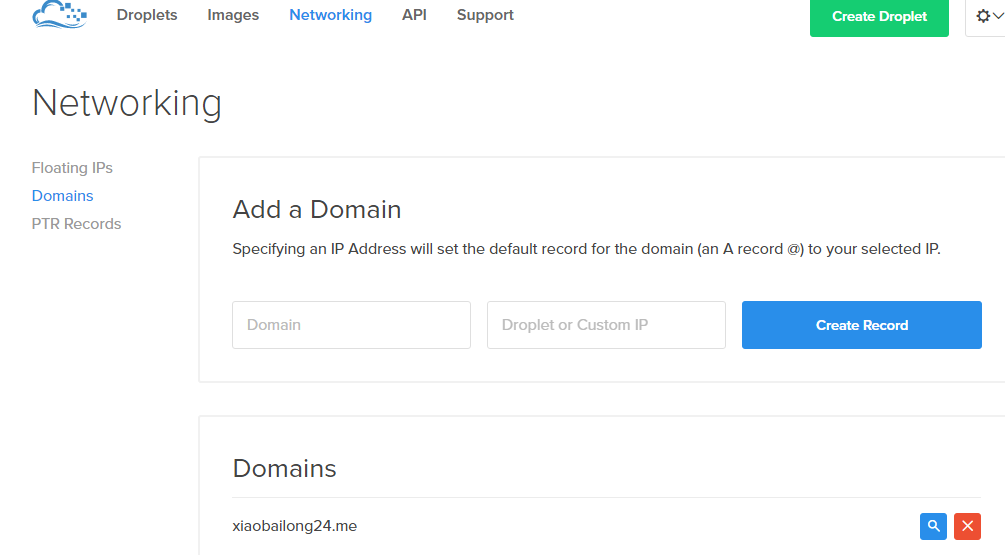
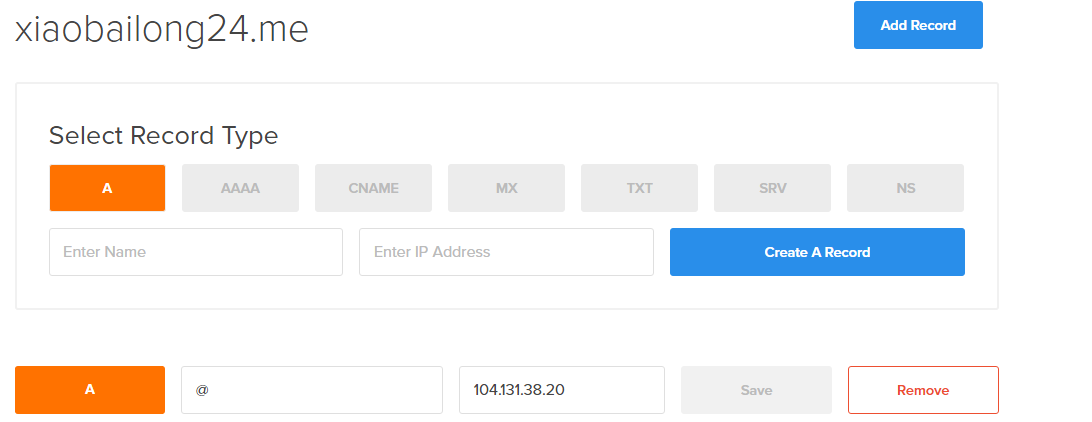
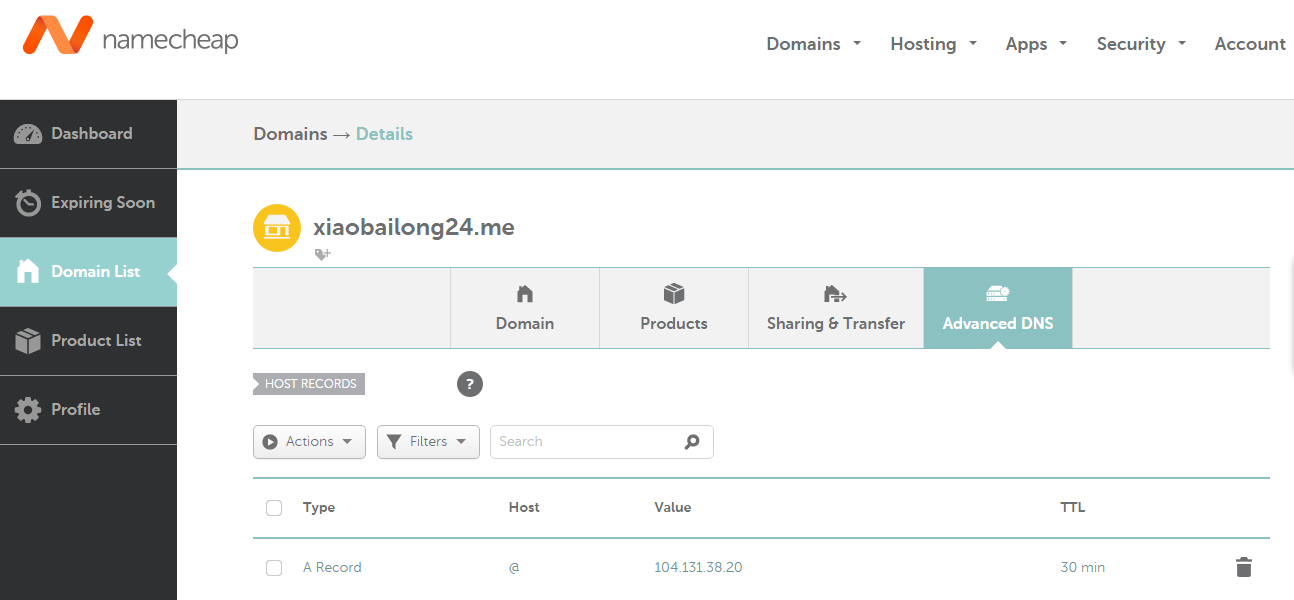
绑定域名
最后登录NameCheap网站,将自己的IP绑定自己的域名并添加DNS解析。这样就可以在浏览器输入域名查看自己的博客了。
使用 Gitment 评论
Github: https://github.com/imsun/gitment
登录鉴权: https://github.com/imsun/gh-oauth-server
Issue: https://github.com/imsun/gitment/issues/170